A method to “skip” winter-sowing? : Swamp Milkweed Grow-Along, Chapter 3
By Alysha McGrattan, Program Director
Even though it is often better to follow nature’s cycles, sometimes we just don’t have the time to wait a few months to germinate seeds. Our Program Director Alysha has tried out different ways to speed up the stratification process to grow Milkweed. While Sam’s seeds are waiting in the yard, sleeping in dormancy until winter is done, let’s take a look at Alysha’s method of germinating Swamp Milkweed seeds to help Monarch Butterflies!
In December 2020, my fiancé and I bought our first home. Being a Monarch-enthusiast, I was so excited to have a place of my own to start filling with Swamp Milkweed. I had the best intentions in January to devote time to stratifying my seeds… the only problem was that out of nowhere (!!), January turned into April and I had missed the window to be able to give my seeds the weeks of cold treatment in the fridge that they needed, or to use the winter sowing method.
I was so upset that I would have to wait an entire year to try again. Sure, I could buy Milkweed plants, but that would quickly get expensive with the quantity of plants I knew I wanted to have. I figured that there must be some way to speed up the process, so I did some googling and decided to do a little experiment…
I learned that there are two different cold stratification methods: “cold-dry stratification” and “cold-moist stratification”. Moist stratification (the recommended stratification method for milkweed) requires seeds to be subjected to temperatures between 1-3 degrees C in damp conditions, while dry stratification requires seeds to be subjected to temperatures below freezing, in, you guessed it, dry conditions. So, I thought to myself: if the recommended time for cold moist stratification of Milkweed seeds is six to eight weeks in the fridge, maybe that process could be sped up with a colder dry-shock?
But I didn’t stop there. I also wanted to figure out how to help the seeds germinate faster to catch up as much lost time as possible. So, back to Google I went! This time I came across this article. I had an Instant Pot, and nothing to lose, so I hatched a plan for my Milkweed experiment: dry-cold stratification in my freezer for one week, followed by 48 hours in my Instant Pot.
Fast-forward less than a week and a half and 90% of my seeds had germinated! I couldn’t believe my luck. I kept my seedlings in a sunny window until late-May, then hardened them off outside, and when they were about 6-8 inches tall, I planted them outside. Since then, I’ve repeated this method each year, with the same success and have given out the plants to friends, family, and Nature NB workshop participants.
So, this blog is for anyone who is like me, and forgot to plan for spring back in January – there is still time! Good luck with your gardening this year and if you have any other inventive Milkweed growing tips, we would love to hear them!

Alysha’s Milkweed Seed Starting Method
Step 1: Take the seed package and put it directly into your freezer. Leave for one week. *Try to find a spot where they won’t be disturbed, I would suggest avoiding to put them in the freezer door if you’re opening your freezer frequently.
Step 2: Take the seeds out of the freezer and spread them out on a damp, wrung-out paper towel. Try not to overcrowd the seeds; you may need to use a few sheets. Gently fold the paper towel, slide into a sealable plastic bag, and seal it.
Step 3: Add about two cups of water to your Instant Pot, and place the plastic bag on top of a steamer trivet.

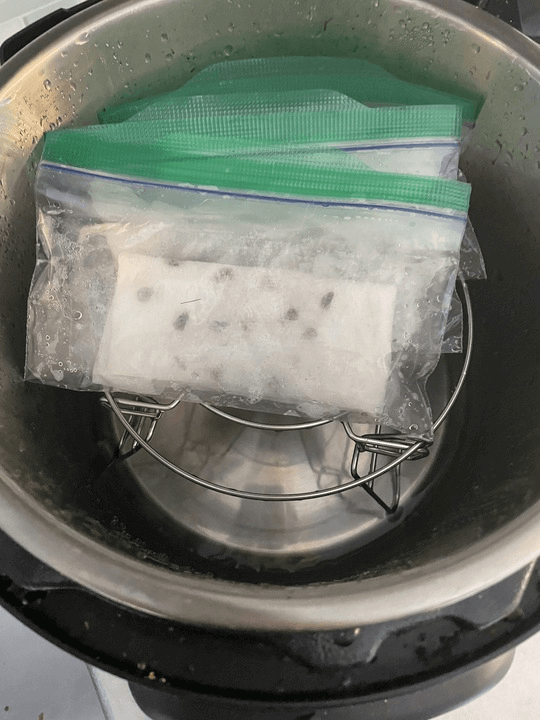

Step 4: Seal the Instant Pot and turn on Yogurt setting for 48 hours. *My Instant Pot doesn’t have a Yogurt setting so I use the Sous-vide setting at 91 degrees F. In some models the maximum time may be 24 hours, so just add additional time when it is down to a couple hours left.
Step 5: After 48 hours, remove the lid, gently open the sealed plastic bag and unfold the paper towel. Your seeds should have germinated by this point. Sometimes the radicle (the little root sticking out) can grow into the paper towel, so take care to not break them off. If a large number of your seeds have not yet germinated, you can put them back into the pot for another 12.

Step 6: Plant out your milkweed seeds! Make a small fingertip indentation in your pot soil, drop the seed in, and cover lightly. It’s important at this stage that the soil stays moist but not wet, and that the seedlings get bright indirect light. I like to keep mine covered (with cling-wrap or a plastic lid) in a south-facing window.
Step 7: Proceed as normal in growing/hardening off your plants as you move them outside!
Note that the cold-dry stratification method can still be used without an Instant Pot! The rate of germination has been about 50% for me, and takes a week or more when I have planted the seeds in a windowsill straight out of the freezer.
See you next time in April for the next installment of our Grow-Along.